22/09/2017
Fall in love tag with May Flaum

Hello and happy pumpkin season! May Flaum here to share a new project with you. It's my favorite time of year, and today I'm here to share just one idea on how to put your stamps (and card making skills) to use in another kind of way. Create a gift tag! Perfect for a gift or a neighborly offering of baked goods or just because - it's the season for giving. This project features the new Fall in Love stamp and Cinderella Pumpkin stamp as well.

To start, I stamped the pumpkin and then "fall in love" on watercolor paper.

Once this is stamped, go ahead and color as you please. I used Clean Color markers and a water brush to blend.
  Once dry, it is ready to go! If you want a more wild and messy look then spray with water and watch the color go! This works with most watercolor/water reactive mediums.  
I simply adore how this turned out and I've got a fresh batch of pumpkin muffins ready to share with a neighbor - all tied up with this tag! Remember our stamping and card skills can easily be used for home decor, tags, and even scrapbooks! I hope I've inspired you to play with some fall stamps today.
|

Friday, September 22, 2017
Fall in Love tag with May Flaum
Thursday, September 14, 2017
Pumpkin and Leaves Thank You Card by Debbie Seyer
14/09/2017
|
Hello friends! Debbie Seyer here today to share with you a card I created using 2 new stamps from Pink Ink called Dancing Leaves and Cinderella Pumpkin. One of my most favorite stamping techniques is to heat emboss and I thought both of these stamps would be perfect for that technique.
As you can see, I stamped the Dancing Leaves stamp all over the brown cardstock using embossing ink. Then I sprinkled on some Copper embossing powder and heat set it. I also stamped the Cinderella Pumpkin using the Copper embossing powder but I stamped it on some watercolor paper. I used the some Sparkle Markers and a water brush to color the image.
I used a die for the sentiment. I die cut it 3 times and glued the layers together, then I inked up the die cut with embossing ink and used the copper embossing powder. I ended up doing 2 layers of embossing powder to get the look I wanted! Here is a closer look at my card.

I really love the stamps I used for this card and think it turned out really great! Thanks for stopping by today!
Pink Ink products used, available retail online from Ellen Hutson LLC
Or check Pink Ink's website to find a local store near you that sells our stamps (retail), or to order wholesale.
 |
Tuesday, September 5, 2017
Dancing Leaves by Sharon Harnist
5/Sep/2017
|
| It's beginning to feel a little like Fall -- one of my favorite seasons! So today's card honors cooler temperatures and rich, beautiful Autumn colors!  Tuxedo Black ink onto a Neenah 110 lb. Solar White top-folding card and the beautiful leaves colored mainly with these Copic markers: E07, E25, YG95, YR07, YR24:   Happy Fall . . . Thanks for joining me today!  Or check Pink Ink's website to find a local store near you that sells our stamps (retail), or to order wholesale. |

Tuesday, July 11, 2017
House of Flowers by Sharon Harnist
I'm loving #WorldWatercolorMonth and Pink Ink's beautiful stamps are a colorist's dream to work with -- The images are always so highly detailed and a pleasure to color! Today's images of choice are some beautiful new florals:
To begin, I stamped the adorable new House of Flowers with Memento Tuxedo Black ink in the center of my watercolor paper, then stamped the equally as cute Pretty Petals flower around the edges of the panel, to create a frame. I used Memento Tuxedo Black ink, knowing it works well with Copic ink. Did you know you can "watercolor" with your Copic Various Ink Refills? Yes! It is quite simple -- Just squeeze a little of the refill ink into a palette, fill a waterbrush with Copic Colorless Blender, then pick up your desired Various Ink color with the brush and paint away!
Here are the Copic Various Ink colors I used (click on any photo, for a larger view): 1. V15, 2. RV17, 3. R24, 4. YR04:

On some of the flower petals, I did a couple of coats of ink to deepen the color, allowing the first coat to dry before adding more color. I also was able to achieve some shading this way, too.
5. Y15, 6. YG03 for outer parts of leaves. I didn't have a good darker Various Ink Refill to compliment YG03, so I just used a G05 Copic Sketch Marker to color the centers of the leaves:

7.E21 and E23 for the house and chimney.
8. B0000 was used to lightly color wash the sky. Very lightened (with Copic Colorless Blender) YG03 was washed below the sky, to create grass.

To finish the card, I die cut the watercolored panel with a large stitched frame, then mounted the piece onto a Lemon Meringue card base.

Thanks for joining me today! ~ Sharon
Pink Ink products used, available online through Ellen Hutson LLC:
Or check Pink Ink's website to find a local store near you that carries our stamps, or to order wholesale.
|


Wednesday, July 5, 2017
Pretty Petals stamp: one stamp many ways with May Flaum
07/05/2017
It's so easy to forget: we can do things more than one way! Hello there - May Flaum here and today I'm featuring the Pink Ink stamp "Pretty Petals" - and several ideas on how to use this stamp on your projects.

#1 is the obvious: stamp it onto paper and color as seen here.
#2 is an often forgotten favorite: stamp with versamark or watermark ink on watercolor paper. Then watercolor - or in my case splash on some distress ink - and see what happens. Versamark usually ends up darkening the color(s) of watercolor but note this technique isn't super reliable and results vary depending on the paper used too. So use it as a "messy" background works best.

#3: stamp with dye ink, then coat in clear embossing powder and seal. Why do this? It seals in the color. So for example with distress ink it means that flower I stamped stays sharp no matter what else I do.

#4: Stamp with distress ink + water, mist, or otherwise some kind of "sloppy" type of image. It makes a watered out faded image and can accent projects beautifully.
Four ways on two cards - and these ideas could all work on other projects as well. Here is my video run through (it's short!) on YouTube.
The stamp I featured is "pretty petals" by Pink Ink- I just love the size and the awesome details on this stamp. I also used the do what you love stamp for my sentiment.

When it comes to stamping I love that it can be as simple as black ink on paper to layered techniques that take a lot of time - and I love that you can get countless looks from just one stamp.

I hope you've enjoyed this quick video and these card projects that I've shared with you today.
It's so easy to forget: we can do things more than one way! Hello there - May Flaum here and today I'm featuring the Pink Ink stamp "Pretty Petals" - and several ideas on how to use this stamp on your projects.

#1 is the obvious: stamp it onto paper and color as seen here.
#2 is an often forgotten favorite: stamp with versamark or watermark ink on watercolor paper. Then watercolor - or in my case splash on some distress ink - and see what happens. Versamark usually ends up darkening the color(s) of watercolor but note this technique isn't super reliable and results vary depending on the paper used too. So use it as a "messy" background works best.
#3: stamp with dye ink, then coat in clear embossing powder and seal. Why do this? It seals in the color. So for example with distress ink it means that flower I stamped stays sharp no matter what else I do.

Four ways on two cards - and these ideas could all work on other projects as well. Here is my video run through (it's short!) on YouTube.
The stamp I featured is "pretty petals" by Pink Ink- I just love the size and the awesome details on this stamp. I also used the do what you love stamp for my sentiment.

When it comes to stamping I love that it can be as simple as black ink on paper to layered techniques that take a lot of time - and I love that you can get countless looks from just one stamp.

I hope you've enjoyed this quick video and these card projects that I've shared with you today.
Thursday, June 15, 2017
Bookmark with May Flaum
15/06/2017
|
May Flaum here, kicking off summer with a crafty bang. I was trying to think of something fun to gift the girls to start summer, and I got to looking at this book owl Pink Ink stamp that they sent me a few weeks back.  What to do with it? Bookmark!  I began by using some clean color markers to make the books into a rainbow, and add a bit of color to the owl as well. Note that I didn't color every single detail - just some fun color + water with a water brush. Just add a bit of color with the marker, then add a bit of water and blend.  Repeat as needed it's that simple to create simple coloring! Then I took some nuvo crystal drops to add dimension to his glasses, the book titles, and anywhere else I felt like it would add a little something.  The supplies I used on this project include: Pink Ink Book Owl Stamp and Pretty Petals, Heidi Swapp gold mist, Clean Color Markers, Nuvo clear drops, and Lawn Fawn patterned paper My white paper is 1 3/4" wide, I mounted it on 2" wide patterned paper after stamping (and coloring in same way). 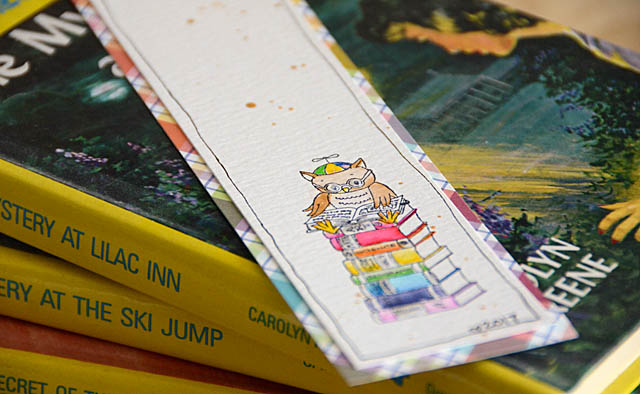 I also added some flecks of gold, and a bit of pen work in form of an outline and the year. This bookmark wasn't quite complete, so I punched a hole and added some trim.  Here is the finished result - along with some Nancy Drew summer reading for the girls! The rainbow stack of books is my favorite thing I've colored in quite a while - and I had a lot of fun making something totally flat (for a change!) with this project.  I hope you've enjoyed this project - it sure was fun to make and a reminder that I can have hand crafted detail - even when I read! |
Thursday, June 1, 2017
Father's Day Golfing by Sharon Harnist
1 June, 2017
|
| Hello, Pink Ink Fans -- Sharon Harnist back with you again today! Here it is June 1st and Father's Day is right around the corner. I thought I'd better be prepared for the day, with a card for my husband! Golf is his favorite past time, so I thought this new The Golfing Line stamp image from Pink Ink would be perfect for him!  . .
The fun background was created by airbrushing Copic G09 onto white cardstock,
through a stencil I thought resembled golf balls! After removing the stencil, I
airbrushed lighter Copic G03 over the white background:
 The golf image was stamped with Memento Tuxedo Black ink onto Neenah 110 Lb. Solar White cardstock and colored with these Copic markers: 
I know the orange golf balls may seem like an odd choice of colors, but that's the color my husband prefers! That's the beauty of stamping and being able to custom color things exactly as you wish!
I stamped, colored, and cut out an additional golf bag, then popped it up with foam tape:

I love all the fine golfing details in this image!
 Are you ready for Father's Day? What activities do you have planned? Pink Ink products used, available online through Ellen Hutson LLC: Or check Pink Ink's website to find a local store near you that carries our stamps, or to order wholesale. |

Tuesday, May 23, 2017
Let's Jump For Joy!
24/05/2017
|
| Hello friends! Debbie Seyer here today to share with you my latest card using Pink Ink Stamps! I received some new images from Peggy just a week ago and was so excited to use them right away! It's high school graduation time here at our house. We have friends and family members that are graduating so I needed a few cards for that occasion. Here is a card I created using the new 2294G Hi Top Sneakers and 19144B Jump For Joy sentiment. 
To begin, I always pick a paper pad so I have a color scheme. For this card I used the Perfectly Plaid 6x6 petite paper pad from Lawn Fawn. Then I pick my marker colors. I use Spectrum Noir alcohol markers. Here are the colors....

After coloring the images, I just fussy cut them out. I used a chevron embossing folder for the background layer and scalloped squares dies for behind the shoes. Here is a closer look!

We have a family friend who love hers converse and is super happy to be graduating, so I thought this image and the sentiment were perfect for her!
Thanks for stopping by today!
 |
Sunday, May 14, 2017
Bluebonnet Highway by Sharon Harnist
14 May, 2017
|
| Hello Pink Ink Fans -- Sharon Harnist back with you! Today I'm sharing a typical Texas Spring scene created with a wonderful new stamp from Pink Ink Stamps, Bluebonnet Highway:  It wouldn't be Spring in Texas without the ritual of snapping photos with your children in them ... I have lots of fond memories! The bluebonnets create a gorgeous sea of blue. To try and replicate their coloring for this stamp image, I used Copic markers. After stamping the Bluebonnet Highway with Memento Tuxedo Black ink onto Copic's X-Press It Blending Card, this is how I colored it: 1. Color all the flowers with a base coat of B12. 2. Color centers of flowers with B24:  3. Color stems, leaves and grass with YG23 and G07. 4. Darken behind and in between flowers with B26. 5. Color fence posts with E42 and E44. 6. Color bird with N1 and N4 to resemble the Texas state bird, Mockingbird:  7. Using lighter YG01, B00 and B0000, color behind foreground bluebonnets to create grass and flowers in the background field. 8. Using a die cut cloud stencil, airbrush B00 for the sky. Not shown: Airbrush the remaining lower white space with YG23 to create grass. To finish the card, I mounted a die cut Hello frame over the colored image using foam tape, trimmed the image to the size of the frame, then mounted the framed image to a kraft card base. 
Thank you for letting me share a little bit of Texas beauty with you today!

To find a local or online retailer who carries our stamps, please visit Pink Ink Stamps.
|
Thursday, March 2, 2017
Every Day Boho Flower Frame by Sharon Harnist
Hello, Pink Ink fans -- Sharon back with you again today! Spring has arrived
in my part of the country and on the blog today, as I'm using Pink Ink's
|
 Isn't this a gorgeous floral garden? It has such beautiful, fine details! I gold heat embossed the images onto watercolor paper and then simply picked up color directly from Tim Holtz's new Distress Oxide ink pads with a waterbrush and colored away! The wonderful thing about this frame is that you can used it it in either a horizontal or vertical orientation! After the flowers were colored and the sentiment heat embossed, I die cut the image with a stitched rectangle die, off-centered, leaving extra space on the left side. Then I punched holes and tied a gold cord bow.  To finish the card, I put double-sided tape around the edges of the die cut and poured glitter on the tape. The finished image was popped up with foam tape onto a light blue card base.  Just change out the sentiment and you could easily use this floral frame card idea for just about any occasion! I hope you have fun with it!
Thanks so much for joining me today!
Pink Ink products used, available online through Ellen Hutson LLC:
Or check Pink Ink's website to find a local store near you that carries our stamps, or to order wholesale.
 |


Subscribe to:
Posts (Atom)